Knowledge Base Archives: Service Instructions
M1: Metal Clutch Replacement
For Video Instructions, click here: Replacing the Clutch (Plastic) Step 1- Remove the handle from the handle rests and place the handle in the full forward position as shown. Step 2- Stand the WaterRower upright and disconnect the bungee as shown. Step 3- Lay the WaterRower down and slowly pull the handle so that …
M1: Wire Harness Replacement
Position the handle forward to the front Forward Riser pulley Carefully remove the Top Deck by removing the Top Deck bolts and upper Tie Rods. Gently lift the Top Deck up being careful not to dislodge any of the guide pulleys. Unclip the sensor connector from the wire harness. Remove the footboard handle rests, and loosen …
M1: Monitor Sensor Disk Alignment
If your S4 monitor is flashing zeros and not counting down, there is one simple check you can do that may solve the problem. You can check the position of the Sensor Disk. During shipping of your WaterRower Tank this Sensor Disk can slide slightly downwards. The diagram below shows the position of the Sensor …
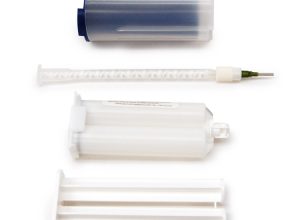
M1: Tank Reseal
Please handle the tank carefully, as cracking either the top or bottom half would cause irreparable damage. If your tank has any cracks, you will need to replace it (WaterRower Part # WRPT004). Please read all instructions carefully before beginning any WaterRower service actions. Please view the WaterRower tank repair video at: https://www.youtube.com/watch?v=LJI_UmcQoZA We highly …
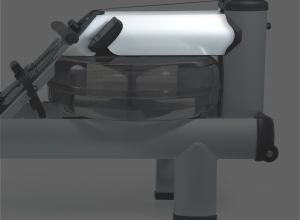
M1: Tank Cover Removal
Video Instructions: Removing & Replacing the M1 Tank Cover Step 1. Place handle into the most forward position near the Forward Riser Pulley. Step 2. Remove the rest bolts. Step 3. Pivot back the footboard. Step 4. Remove the cover from the rower to expose the top deck.
M1: Top Deck Replacement
For Video Instructions, click here: Removing the Top Deck Step 1- Remove the handle from the handle rests and place the handle in the full forward position as shown. Step 2- Stand the WaterRower upright and disconnect the bungee as shown. Step 3- Lay the WaterRower down. Remove the Tie Rods and JCB bolts …
M1: Short Tank Assembly Replacement
1. Remove the handle from the handle rests and place in the full forward position. 2. Stand the WaterRower upright and disconnect the bungee. 3. Lay the WaterRower down and pull the handle so the drive strap unwinds from the clutch housing. Remove the handle and drive strap from the clutch by unstrapping the velcro on …
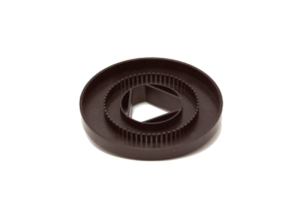
M1: Recoil Bushing Replacement
Handle Removal Step 1- Remove the handle from the Handle rests and place the Handle in the full forward position. Step 2- Stand the WaterRower upright and disconnect the bungee from the Recoil Belt as shown. Step 3- Lay the WaterRower down and slowly pull the handle so that the Drive Strap unwinds …
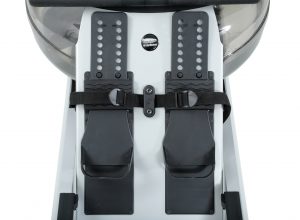
M1: Recoil Belt Buckle Replacement
Step 1- Pass the Recoil Belt through the bungee buckle with the belt facing the serrations on the buckle as shown. Step 2- Pass the Recoil Belt through the D-ring and back through the bungee buckle as shown. The Recoil Belt should follow itself back through the buckle. It is advised that the loose …